Five AIP UL Client Custom Settings Worth Considering

As we’ve previously discussed there are two ways of applying labels to documents in Windows 10 – either using the built-in functionality of Apps for Enterprise (i.e. Word, Outlook, PowerPoint, or Excel) or using the AIP Unified Labelling (UL) Client. If you choose to use AIP UL Client then you are able to customize how it functions using advanced settings that are configured using PowerShell.

In this article we talk about the five settings you might want to configure and why. I have assumed here that you’re using M365 E3 or Business Premium (not E5), and that you’re not using AIP UL Scanner to scan files in the background.

Setting 1: Turn off custom permissions in File Explorer

By default AIP UL Client’s “Classify and Protect” menu includes the option for setting custom permissions for a document. When you tick “Protect with custom permissions” you’re presented with a bewildering range of options.

AIP UL Client showing custom permissions options

If you have chosen (as I’d strongly recommend) to define labels and their encryption centrally then you don’t want users defining custom permissions.

My first recommendation is to disable this functionality using the below PowerShell command.

Set-LabelPolicy -Identity Global -AdvancedSettings @{EnableCustomPermissions="False"}

This has the effect of removing this menu option:

Find out more about this command here.

Setting 2: Help users tell you when things aren’t working right.

During your pilot – and possibly even during rollout – it would be really useful if users could easily find a way to report issues and automatically hit the right mailbox. All that “Tell Me More” does is send you to the Microsoft website to a page introducing Azure Information Protection.

Thankfully, this functionality exists within AIP UL Client – but only if you turn it on and specify a email address or website.

AIP without any means for reporting an issue

This is my second recommendation – enable the “Report an Issue” feature using the below powershell command.

Set-LabelPolicy -Identity Global -AdvancedSettings @{ReportAnIssueLink="mailto:helpdesk@contoso.com"}

After running this command an additional link is added to AIP:

AIP with Report an Issue option

Find out more about this command here.

Setting 3: A button is better than a dropdown

By default, the AIP UL Client is configured to not show unless the user chooses to have it show in Outlook, Word, Excel and PowerPoint. The user if they want it to show has to go through each application clicking the dropdown and selecting “Show Bar”.

AIP bar is not enabled by default

Personally, I think it’s easier to press a button on a bar that is already displayed than to select a sensitivity label from a dropdown menu. I would rather the bar show by default. If your organisation has laptops with small screens then you might not want to do this as screen real estate is at a premium.

My third recommendation, then, is to make the AIP bar show by default in all supported apps. To display the Information Protection bar in Office apps by default use the below PowerShell command:

Set-LabelPolicy -Identity Global -AdvancedSettings @{HideBarByDefault="False"}

Once you have made this configuration change the AIP UL client bar will show in the Office apps – such as Word:

Find out more about this command here.

Setting 4: Prevent the user from clicking “Not Now”

Confusingly if mandatory labelling is enabled but no default label has been specified then when a new document is created the user will be prompted to apply a label, but the prompt includes a button marked “Not Now”.

AIP dialogue with "Not Now" button

I understand why this is there – it’s so users can step past the requirement to provide a label at that point in time. Maybe the user is too busy to press “Internal” but not too busy to press “Not Now”? The presence of the button doesn’t enable the user to avoid applying the label – they will still be required to do so when they save the document.

To my mind however this makes little sense and as such its my fourth recommendation – disable the “Not Now” button by using the below powershell command:

Set-LabelPolicy -Identity Global -AdvancedSettings @{PostponeMandatoryBeforeSave="False"}

After you have run this command the “Not Now” button will be banished:

The "Not Now" button in the AIP UL Client save dialogue has gone

Just to reiterate – if you have mandatory labelling enabled, and have specified a default label, the “Not Now” button never appears and so this is not required.

Find out more about this command here.

Setting 5A: Specify the colour for the label

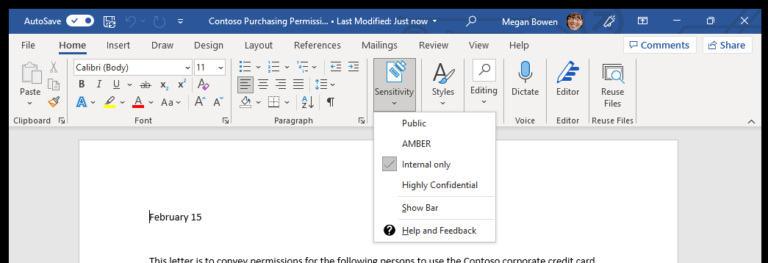
By default, the AIP bar has no colours against each label – they are all shown with a grey background and a grey and black 🏷 icon. As shown below…

Picture showing labels in grey not in colour

Let’s suppose for example you use a traffic light system containing labels imaginatively named RED, AMBER and GREEN. When creating the labels you want to make them more obvious such that the RED label is actually red, AMBER is amber etc? One option would be to use powershell to specify the colour of the label using the below command:

Set-Label -Identity AMBER -AdvancedSettings @{color="#ffbf00"}

In this code, AMBER is the name of the label and ffbf00 is the RGB code for the colour amber.

You can see the effect this command has visually in the below image:

Find out more about this comment here.

Setting 5B: Specify the colour of the label

I realise you may well have read the above and thought – “Okay… but what if I actually want the label colour to be orange? Not the little icon, or the button, but the watermark, header or footer text.”

Microsoft offers only a limited range of colours in the compliance center sensitivity label configuration menu as can be seen below:

Orange is not one of the available colours.

But it is possible to change this using PowerShell. In the example below, the colour is changed for the watermark associated with the label:

set-label -identity AMBER -applywatermarkingfontcolor "#ffbf00" 

After this change my watermark for the AMBER label changed from Yellow to orange:

Watermark is now orange

This does have the side effect that the watermark “Font color” in Compliance Center is shown as a blank space rather than a colour however. Find out more about this command here.

We hope this has helped you to understand how you might want to customise the user experience for AIP UL Client and perhaps help you understand some of the reasons why you might choose the more customisable AIP UL Client over the Sensitivity Label client that is built into Apps for Enterprise/Apps for Business.
 

Building a workable solution using sensitivity labels however is not straightforward and needs to be properly planned prior to users having to interaction with the solution. If you want to talk more about how you might leverage them as part of a broader information governance and protection strategy please get in touch by emailing us at info@amdhservicesltd.com or give us a call on 01332 322 588.

Want to know more?

Why not contact us to arrange a FREE consultation to talk about your ICT needs and how they could best be met?